I’ve been using Visual Studio Code for all my notes. I have used Typora, Obsidian, and Zetlr, but I keep coming back to VS Code, because of its extensibility, customizability and integrated terminal. Here is how I set it up for note-taking.
This post complements my previous “how-to” Override VS Code’s Terminal Color Theme.
Here are the extensions that I use for notes (and only notes), in no particular order:
- Markdown Extended
- Highlight which perhaps is based on TODO Highlight
- Spell Right to integrate OS native spell check capabilities (tip: hit Cmd+. to correct misspellings).
There is a fourth extension I use - a totally customized TouchBar extension for macOS, built with zero code!
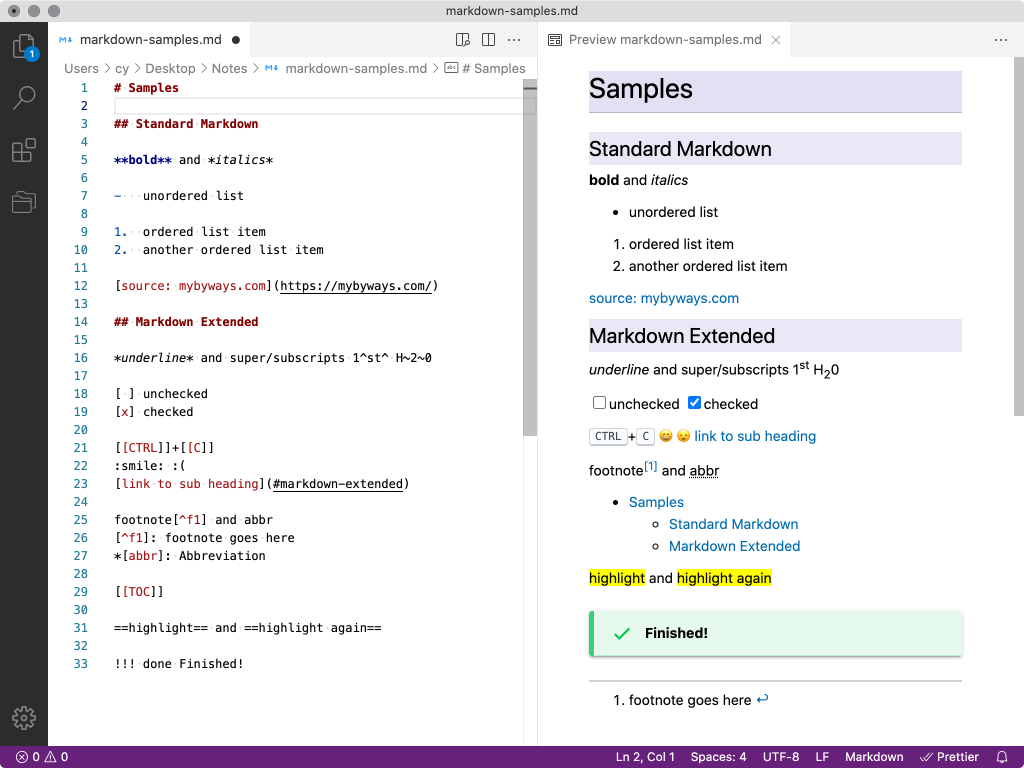
Markdown Extended Extension
Here is a short summary of capabilities added by the Markdown Extended extension:
- Keyboard shortcut keys, like Ctrl+B to toggle bold,
- Table editing features,
- Extended syntax that can be Previewed, e.g.
| Markdown | Description |
|---|---|
[ ] and [x] |
Unchecked and checked checkboxes |
^text^ and ~text~ |
Enclosed text is superscript and subscript respectively, e.g. 1st and H2O |
_text_ |
Enclosed text is Underlined with <u> (instead of italics!) |
~~text~~ |
Strikethrough enclosed text |
[[Ctrl]] |
Enclosed text is rendered in a <kbd> tag like this Ctrl, but... |
[[TOC]] |
The keyword TOC renders a table of contents based on # headings |
:emoji: |
Emojis like :P and :smile: get rendered as 😛 and 😄 |
[title](#heading) |
Link to headings in same document (anchors), replacing spaces with dashes, e.g. if the heading is ## Sub Heading, the link would be to (#sub-heading). |
[^f1]: text |
Footnotes, which appear at the bottom of the whole page (which must be unique), and linked to via... |
[^f1] |
Renders a superscript link to footnotes like this [1] (footnotes are sequentially numbered and the name fn1 is not shown) |
*[abbr]: text |
Abbreviations with tooltips, where ever abbr appears in the document |
==highlight== |
highlights (“marks”) the enclosed text |
!!! note text |
Shows an “admonition” notice, where note is the icon to be displayed. More on this below... |
Digression: Workspace Settings
In subsequent sections, I make a lot of changes to Settings. You can access settings:
- From the menu, Code > Preferences... > Settings,
- From the menu, View > Command Palette..., and search for Preferences: Open Settings (JSON),
- Or via the Cmd+P shortcut, and type
settings.json.
Also, I want to point out that if you are using Workspaces, you can place your settings in a workspace settings file. Generally the way I work is:
- “A "workspace" is the collection of one or more folders that are opened in a VS Code window (instance).” - I use one Workspace for all my notes, e.g.
~Desktop/Notes. - Therefore I can have workspace-specific settings configured in
~Desktop/Notes/.vscode/settings.json
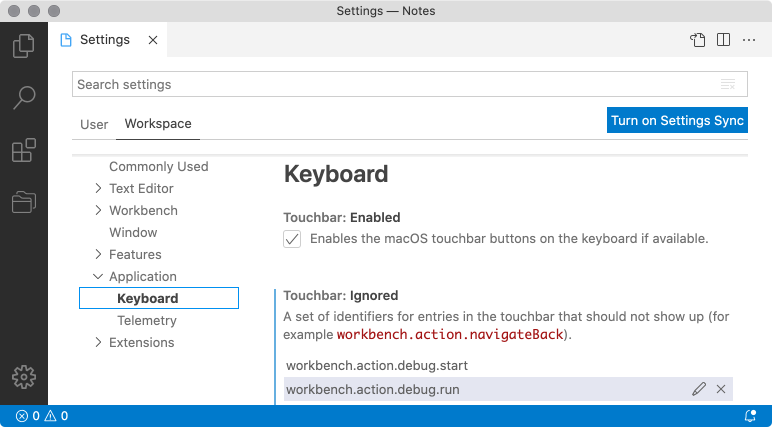
For example, in this screenshot, I know when I am taking notes, I’ll not be debugging anything. So from the settings UI, I can turn off anything to do with debugging in the touchbar, action bar, etc. for this workspace:
My workspace .vscode/settings.json file will contain these lines to override the default user setting (plus, I can add more to buttons to Nasc VSCode Touchbar
):
{
    "keyboard.touchbar.ignored": [
        "workbench.action.debug.start",
        "workbench.action.debug.run"
    ],
}
Disabling Markdown Extended plugins
MarkDown Extended can be configured to disable some features. For example, I might want to turn off the following:
admonition- because I use!!!differently when editing this blog (since the first word is expected to specify an icon and will not be displayed).container- because then Preview needs to include Bootstrap CSS styles, which adds to bloat.html5-embed- because this sometimes breaks links that are wrongly considered audio/video (e.g..tsextensions) and as a result, the entire Preview page will not render.
So:
"markdownExtended.disabledPlugins": "admonition,container,html5-embed",BTW “Admonition” takes this:
!!! note Important stuff here
!!! danger
    Quicksand ahead!
And renders it as:
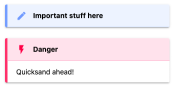
The first word denotes the icon, which can be, e.g.:
- note, summary, question, hint
- todo, done, fail
- warning, danger
Overriding Keyboard Shortcuts
Markdown Extended enables key bindings for Ctrl+B and Ctrl+I to toggle bold and italics.
On macOS, I’d rather override them to use Cmd+B and Cmd+I because of muscle memory I can live without the default bindings for these keystrokes.
- View > Command Palette..., and search for Preferences: Open Keyboard Shortcuts (JSON) (or Cmd+P and type
keybindings.json) - Add something like this:
{
    "key": "cmd+b",
    "command": "markdownExtended.toggleBold",
    "when": "editorTextFocus&&editorLangId==markdown"
},{
    "key": "cmd+i",
    "command": "markdownExtended.toggleItalics",
    "when": "editorTextFocus&&editorLangId==markdown"
}
However, Markdown Extended has a small quirk in that if it cannot select a word, then it does not apply the style.
If you don’t like this behaviour, or would rather not toggle the style, or don’t enable the extension, then this binding simply inserts the required characters:
{
"key": "cmd+b",
"command": "editor.action.insertSnippet",
"args": {"snippet":"**$TM_SELECTED_TEXT$0**"},
"when": "editorTextFocus&&editorLangId==markdown"
},{
"key": "cmd+i",
"command": "editor.action.insertSnippet",
"args": {"snippet":"*$TM_SELECTED_TEXT$0*"},
"when": "editorTextFocus&&editorLangId==markdown"
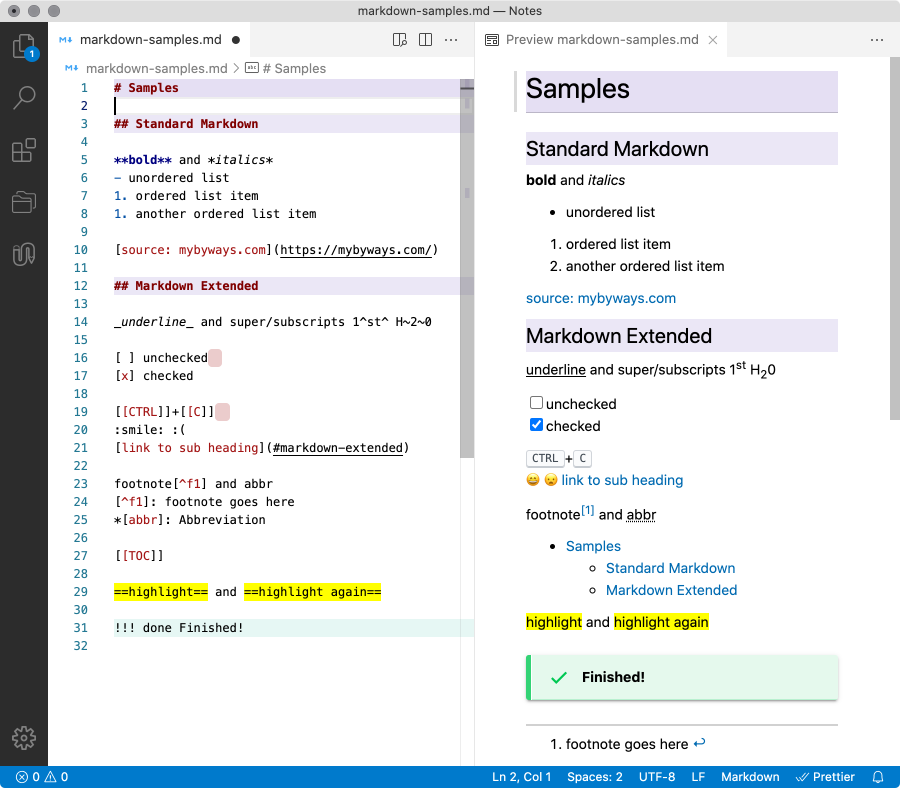
}Highlight Extension
While Markdown Extended can render things like admonitions, highlight, etc. in Markdown Preview mode, it does not change the editor text styles. Enter the Highlight extension.
Highlight applies CSS text decorations to sections of text that match a given regular expression. Styles include:
- color, opacity, backgroundColor - foreground (text) color, foreground opacity and background color
- border, borderColor, borderRadius, borderSpacing, borderStyle, borderWidth
- outline, outlineColor, outlineStyle, outlineWidth
- overviewRulerColor and overviewRulerLane (1=left, 2=center, 4=right, 7=full)
- fontStyle (italic), fontWeight, textDecoration (i.e. underline or over-line), letterSpacing
- isWholeLine (set to true to apply decoration on the whitespace to the end of the line)
Customizing
I configure it to:
==text==to be actually highlighted with a yellow background,- Strikethrough
~~text~~, - Show end-of-line new line marks
- Mark where “admonition” (notes)
!!!blocks are used. - Highlight Headings 1-4 with a background color, and make them appear in the overview ruler (those dots on the right)
Highlight don’t always work as expected when editing. Also, you have to customize the colors to match your own theme!
To configure:
- Edit
settings.json, - And add something like this:
"highlight.decorations": { "highlight.rangeBehavior": 1 },
"highlight.regexes": {
    "(==.*?==)": {
        "filterLanguageRegex": "markdown",
        "decorations": [ {
            "backgroundColor": "yellow" }
        ]
    },
    "(~~.*?~~)": {
        "filterLanguageRegex": "markdown",
        "decorations": [ {
            "textDecoration": "line-through" }
        ]
    },
    "(  +)$": {
        "filterLanguageRegex": "markdown",
        "regexFlags": "gm",
        "decorations": [ {
            "borderRadius": "4px",
            "backgroundColor": "rgba(155,0,0,0.2)" }
        ]
    },
    "(!!! \\w*)": {
        "filterLanguageRegex": "markdown",
        "regexFlags": "g",
        "decorations": [ {
            "backgroundColor": "rgb(205,240,234,0.5)" }
        ]
    },
    "^(# )": {
        "filterLanguageRegex": "markdown",
        "regexFlags": "gm",
        "decorations": [ {
            "isWholeLine": "true",
            "letterSpacing": "2px",
            "backgroundColor": "rgba(190,174,226,0.4)",
            "overviewRulerColor": "rgba(190,174,226,0.5)" }
        ]
    },
    "^(## )": {
        "filterLanguageRegex": "markdown",
        "regexFlags": "gm",
        "decorations": [ {
            "isWholeLine": "true",
            "letterSpacing": "2px",
            "backgroundColor": "rgba(190,174,226,0.3)",
            "overviewRulerColor": "rgba(190,174,226,0.4)" }
        ]
    },
    "^(### )": {
        "filterLanguageRegex": "markdown",
        "regexFlags": "gm",
        "decorations": [ {
            "isWholeLine": "true",
            "letterSpacing": "1px",
            "backgroundColor": "rgba(190,174,226,0.2)",
            "overviewRulerColor": "rgba(190,174,226,0.3)" }
        ]
    },
    "^(#### )": {
        "filterLanguageRegex": "markdown",
        "regexFlags": "gm",
        "decorations": [ {
            "isWholeLine": "true",
            "letterSpacing": "1px",
            "backgroundColor": "rgba(190,174,226,0.1)",
            "overviewRulerColor": "rgba(190,174,226,0.2)" }
        ]
    }
}
You might we wondering why an Extension, as opposed to Themes with Semantic highlighting - alas, that does not seem to allow a background color to be set.
A note about new lines: the original Markdown specification uses one or more blank lines to denote paragraphs <p>, and two spaces at the end of a line for a line break <br>.
If you want to use new lines in this way, edit this setting, to keep end-of-line whitespaces:
"[markdown]": {
     "files.trimTrailingWhitespace": false
}
Preview with styles.css
So now the text editor is customized, how about applying custom styles to Markdown Preview too? Certainly, VS Code allows custom CSS to be applied too!
I am just going to make one small change, so that Markdown Preview will highlight Headings 1-4 with the same background color I used in the editor.
To do that:
- you’ll need a file called
style.cssin your Workspace folder:
h1 {
  background-color: rgba(190, 174, 226, 0.4);
}
h2 {
  background-color: rgba(190, 174, 226, 0.3);
}
h3 {
  background-color: rgba(190, 174, 226, 0.2);
}
h4 {
  background-color: rgba(190, 174, 226, 0.1);
}- then, edit (I assume your workspace settings)
.vscode/settings.jsonand add:
"markdown.styles": [ "style.css" ],This file is always relative to the current workspace. Absolute file paths are not supported for security. If VS Code cannot find style.css, you will see a toast message with an error. Unsaved Markdown files and saved files that are not in this workspace will also prompt the same error. Personally, put my style.css file in the .vscode folder of my notes workspace, and live with the errors.
Coloring Lines
Markdown Extended incorporates markdown-it-attrs to “add classes, identifiers and attributes to your markdown with {.class #identifier attr=value attr2="spaced value"} curly brackets.”
That means, to color a word or line, in Markdown, we can do something like this to have the Preview rendered with colored text:
color the whole line red{style="color:red"}color a single **word**{style="color:blue"} blue
This is a lot to type, so one simplification is to define styles first by putting this block at the start of the Markdown document (for fun I've chosen desaturated colors, but you can also use background-color:red or anything else), i.e.
<style>
.r { background-color: rgb(249,38,114) }
.g { background-color: rgb(166,226,46) }
.b { background-color: rgb(129,154,255) }
.c { background-color: rgb(102,217,239) }
.m { background-color: rgb(174,129,255) }
.y { background-color: rgb(226,226,46) }
</style>
But that’s a lot to type too... so why not just include it in styles.css? That will work too! Do remove the <style> tags of course.
Now, the Markdown can be something like this:
color the whole line red{.r}color a single **word**{.b} blue
Editor Highlighting

Now to configure the Highlight extension to color the line (alas, I cannot color a single word or block of text):
"(.*{style=\\\"color:(.*)\\\"}.*)": {
    "filterLanguageRegex": "markdown",
    "decorations":[ {
        "color": "$2"
    } ]
},
"({\\.r})": {
    "filterLanguageRegex": "markdown",
    "decorations":[ {
        "isWholeLine": "true",
        "color": "rgb(249,38,114)"
    } ]
},
"({\\.g})": {
    "filterLanguageRegex": "markdown",
    "decorations":[ {
        "isWholeLine": "true",
        "color": "rgb(166,226,46)"
    } ]
},
"({\\.b})": {
    "filterLanguageRegex": "markdown",
    "decorations":[ {
        "isWholeLine": "true",
        "color": "rgb(129,154,255)"
    } ]
},
"({\\.c})": {
    "filterLanguageRegex": "markdown",
    "decorations":[ {
        "isWholeLine": "true",
        "color": "rgb(102,217,239)"
    } ]
},
"({\\.m})": {
    "filterLanguageRegex": "markdown",
    "decorations":[ {
        "isWholeLine": "true",
        "color": "rgb(174,129,255)"
    } ]
},
"({\\.y})": {
    "filterLanguageRegex": "markdown",
    "decorations":[ {
        "isWholeLine": "true",
        "color": "rgb(226,226,46)"
    } ]
}
Bonus! You may prefer not to change the font color, but underline the line where the style= is used. In settings.json (I’m being sneaky here by adding a space):
"(.*{style=\\\"color:(.*)\\\" }.*)": {
    "filterLanguageRegex": "markdown",
    "decorations":[ {
        "border": "1px $2",
        "borderStyle": "none none solid none"
    } ]
}
Exporting PDF
Markdown Extended can save Markdown as PDF exactly as seen in Preview, including any output rendered by other extensions (like Mermaid diagrams below) plus the custom style.css above!
This is remarkably simple to setup, but very poorly documented. So:
- Make sure Google Chrome or the open source Chromium browser installed.
- Edit
settings.json - Add or edit this line to point to the browser executable - Chrome on macOS will be:
"markdownExtended.puppeteerExecutable": "/Applications/Google Chrome.app/Contents/MacOS/Google Chrome",- Then from the Command Palette..., run Markdown: Export to File > PDF File
- The PDF will be saved in a folder called
outin the Workspace folder.
Speaking of previews, I also use this extension so I don’t have to leave VS Code to open PDFs:
More Extensions
Other
- Markdown Touchbar - for MacBook Pro users, I don’t use this
- Nasc VSCode Touchbar - I use this, but it does not have any features for Markdown.
Markdown Preview Renderers
These extensions extend Markdown Preview to support:
- Mermaid diagrams - Markdown Preview Mermaid extension
- LaTeX-type math - Markdown+Math extension
This interesting extension renders your Markdown note as a mind map:
UNotes
I sometimes enable UNOTES - Markdown Notes WYSIWYG, as it provides a toolbar and WYSIWYG mode!
However, this extension totally takes over the editor and provides its own Preview, as opposed to working with the default editor and Preview. Therefore, no other extensions will work with it.
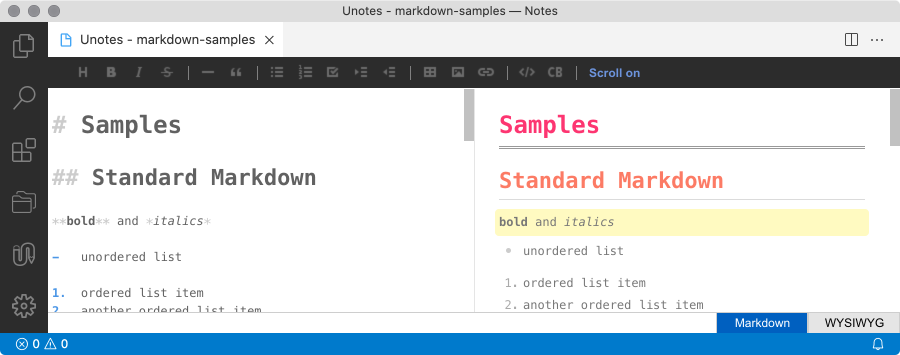
There a some small customizations you can make with UNotes by editingsettings.json, e.g.:
"workbench.colorCustomizations": {
    "unotes.wysH1": "#fd3571",
    "unotes.wysH2": "#fc7b65",
    "unotes.wysH3H4": "#30e3ca",
    "unotes.wysH5H6": "#364f6b"
}
I’m not 100% certain but if I recall correctly, UNotes also did not bind keyboard shortcuts in a manner friendly to other extensions. I had to edit keybindings.json to remove UNotes bindings, like so:
{
    "key": "ctrl+b",
    "command": "-unotes.bold"
},
{
    "key": "ctrl+i",
    "command": "-unotes.italic"
},
Conclusion
Much words! Much customization! Much time wasted... :P
Credits: Some colors based off this ColorHunt.co palette and the Monokai Theme
Added 7 July 22: I’ve figured out snippets! Here is a VS Code Snippet to insert a formatted date and time into my markdown notes.